拓扑
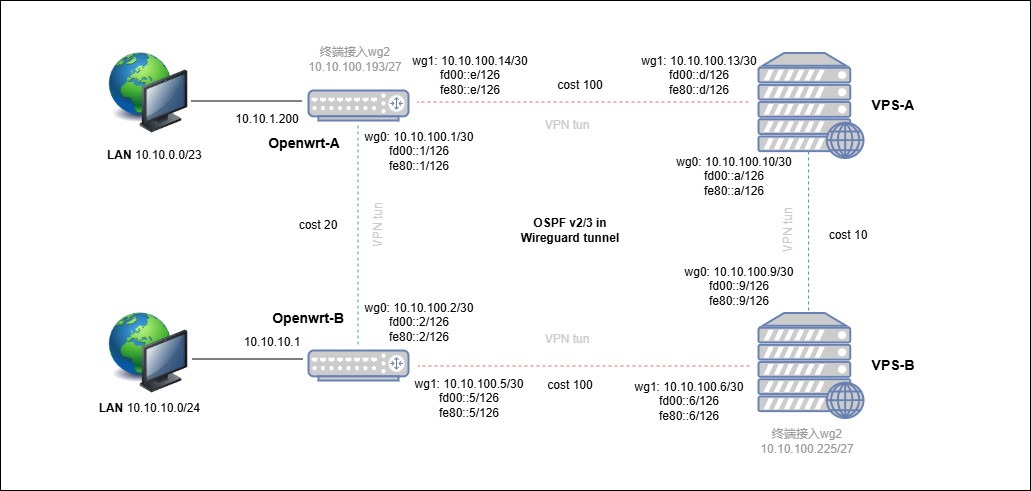
实现多地内网IPv4/6互联,通过OSPF维护动态路由表可形成备用路径,并在VPS-B和Openwrt-A开启2个服务端口用于外部终端的接入。
准备工作
Linux 开启ipv4/6转发
#vi /etc/sysctl.conf
net.ipv4.ip_forward = 1      #启用ipv4转发
net.ipv6.conf.all.forwarding = 1 #启用ipv6转发
#sysctl -p  #立即生效
安装wireguard #搭建VPN隧道
Linux安装Wireguard  https://www.wireguard.com/install/
Openwrt安装wireguard https://openwrt.org/docs/guide-user/services/vpn/wireguard/
安装bird2 #运行OSPF 动态路由协议
Centos
#yum install bird2Openwrt
#opkg update
#opkg install bird2 bird2c bird2cl
配置防火墙与接口和服务自启
1.openwrt 建立wg区域,wg接口加入wg区域,允许wg到lan区域双向的in/out/forward。 2.Linux wg接口上配置PostUP/DOWN实现iptables 流量转发,无需单独修改防火墙 3.wg接口自启,openwrt默认自启,Linux #systemctl enable wg-quick@wg04.bird服务自启,openwrt默认自启,Linux #systemctl enable bird
注意项
1.根据实际情况调整OSPF接口cost值。
2.隧道内允许所有设备互联网段和内网段。
3.隧道允内许ipv4/6 ospf组播地址 224.0.0.5/6 ff02::5/6
4.隧道内允许fe80::本地链路地址
5.OSPF配置wg接口类型为ptp
维护管理
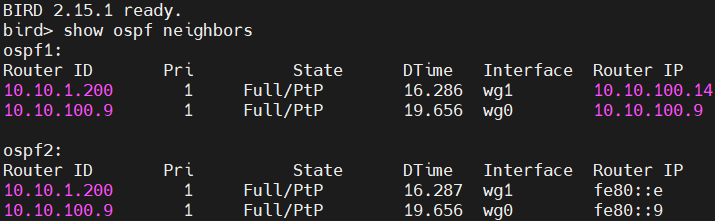
Bird命令
1.bird -c /etc/bird.conf #指定运行配置文件
2.进入bird命令行  #birdc
3.查看ospf进程状态 >show ospf
4.查看ospf接口状态 >show ospf int
5.查看ospf邻居状态 >show ospf nei
6.更新bird配置文件 >config
Wigreguard 命令
1.配置文件 /etc/wireguard/wg*.conf
2.wg生成密钥对 #wg genkey | tee /etc/wireguard/A_privatekey | wg pubkey > /etc/wireguard/A_publickey
3.wg生成预共享密钥 #wg genpsk > /etc/wireguard/preshared_key
4.wg接口状态查看 #wg
5.wg接口启动和关闭 #wg-quick up/down wg*
6.新增wg接口和指定配置文件
# ip link add dev wg1 type wireguard
#wg setconf wg1 /etc/wireguard/wg1.conf
配置文件
Openwrt-A
/etc/config/network    #wireguard 配置

config interface 'wg0'               #接口名称
	option proto 'wireguard'     #接口协议
	option private_key 'xxx'     #本接口私钥
	option listen_port 'xx'      #服务端口
	option nohostroute '1'       #无主机路由
	list addresses '10.10.100.1/30' #接口IPv4
	list addresses 'fd00::1/126'    #接口IPv6
	list addresses 'fe80::1/126'    #接口LLA

config wireguard_wg0
	option description 'Openwrt-B' #对端的描述
	option public_key 'xxx'      #对端的公钥
	option preshared_key 'xxx'   #与对端的预共享密钥
	option persistent_keepalive '25'  #保活时间秒
	option private_key 'xxx'          #对端私钥/可选

        #允许从Openwrt-B对端过来的IP流量
	list allowed_ips '10.10.100.0/24' #IPv4互联地址
	list allowed_ips '10.10.0.0/23'   #允许A的内网段
	list allowed_ips '10.10.10.0/24'  #允许B的内网段
	list allowed_ips '224.0.0.4/30'   #OSPF2组播地址
	list allowed_ips 'ff02::4/126'    #OSPF3组播地址
	list allowed_ips 'fd00::/120'     #IPv6互联地址
	list allowed_ips 'fe80::/126'     #IPv6 LLA地址

config interface 'wg1'
	option proto 'wireguard'
	option private_key 'xxx'
	list addresses '10.10.100.14/30'
	list addresses 'fd00::e/126'
	list addresses 'fe80::e/126'

config wireguard_wg1
	option description 'VPS-A'
	option public_key 'xxx'
	option preshared_key 'xxx'
	option endpoint_host 'x.x.x.x'    #对端公网IP
	option endpoint_port 'xxxx'       #对端服务端口
	option persistent_keepalive '25'
	list allowed_ips '10.10.100.0/24'
	list allowed_ips '10.10.0.0/23'
	list allowed_ips '10.10.10.0/24'
	list allowed_ips '224.0.0.4/30'
	list allowed_ips 'ff02::4/126'
	list allowed_ips 'fe80::c/126'
	list allowed_ips 'fd00::/120'

config interface 'wg2'                #外部终端接入口
	option proto 'wireguard'
	option private_key 'xxx'
	option listen_port 'xxxx'
	list addresses '10.10.100.193/27' #接口IP

#外部终端接入配置,写多个Peer不同公钥和允许对应IP地址/32。
config wireguard_wg2
        option description 'PC'
	option public_key 'xxx'
	option preshared_key 'xxx'
	list allowed_ips '10.10.100.194/32'


/etc/config/firewall    #防火墙配置

config defaults  #默认策略
	        option input 'ACCEPT'
	        option output 'ACCEPT'
	        option forward 'REJECT'

config zone      #lan区域in/out/forward全部允许
	        option name 'lan'
	        option input 'ACCEPT'
	        option output 'ACCEPT'
	        option forward 'ACCEPT'
	        list network 'lan'

config zone      #wg区域in/out/forward全部允许
	        option name 'wg'
	        option input 'ACCEPT'
	        option output 'ACCEPT'
	        option forward 'ACCEPT'
	        list network 'wg0'   #wg接口加入wg区域
	        list network 'wg1'
	        list network 'wg2'

config forwarding   #转发配置 wg to lan
	        option src 'wg'
	        option dest 'lan'

config forwarding   #转发配置 lan to wg
	        option src 'lan'
	        option dest 'wg'


/etc/bird.conf    #bird OSPF配置

log syslog all;
router id 10.10.1.200;   #router ID
protocol device {
	         scan time 10;
	                        }

protocol direct {
	        disabled;
	        ipv4;
	        ipv6;

protocol kernel kernel4 {
	        ipv4 {
	                export all;
	        };
	}

protocol kernel kernel6 {
	        ipv6 {
	                export all;
	        };
	}

protocol static {
	        ipv4;
#route 10.8.0.0/24 via 10.10.0.1; #发布一条静态路由
	}

#OSPF V2配置
protocol ospf v2 ospf4 {
	        ipv4 {
	           import all;
	           export where source = RTS_STATIC;
	        };

	area 0 {
	        interface "wg0" {
	              type ptp;    #接口类型为ptp
                       cost 20;    #接口开销20
                       hello 5;    #hello时间5s
	                };

	        interface "wg1" {
	              type ptp;    #接口类型为ptp
                       cost 20;    #接口开销20
                       hello 5;    #hello时间5s
	                };

	      interface "br-lan" {  #lan口开启ospf

	                             };

	      interface "wg2" {  #接入终端的接口
	             type ptp;
	                          };
	        };
	}

#OSPF V3配置
protocol ospf v3 {
	          ipv6 {
	            import all;
	            export where source = RTS_STATIC;
	        };
	        area 0 {
	                interface "wg0" {
	                        type ptp;
	                        cost 20;
	                        hello 5;
	                };

	                interface "wg1" {
	                       type ptp;
	                      cost 100;
	                       hello 5;
	                };
	        };
	}
Openwrt-B
/etc/config/network  #wireguard配置

config interface 'wg0'
	option proto 'wireguard'
	option private_key 'xxx'
	option nohostroute '1'
	list addresses '10.10.100.2/30'
	list addresses 'fd00::2/126'
	list addresses 'fe80::2/126'

config wireguard_wg0
	option preshared_key 'xxx'
	option persistent_keepalive '25'
	option endpoint_port xxxx'
	option public_key xxx'
	option private_key 'xxx'
	option endpoint_host 'x.x.x.x'
	option description 'Openwrt-A'
	list allowed_ips '10.10.100.0/24'
	list allowed_ips '10.10.10.0/24'
	list allowed_ips '10.10.0.0/23'
	list allowed_ips '224.0.0.4/30'
	list allowed_ips 'ff02::4/126'
	list allowed_ips 'fe80::/126'
	list allowed_ips 'fd00::/120'

config interface 'wg1'
	option proto 'wireguard'
	option private_key 'xxx'
	option nohostroute '1'
	list addresses '10.10.100.5/30'
	list addresses 'fd00::5/126'
	list addresses 'fe80::5/126'

config wireguard_wg1
	option description 'VPS-B'
	option public_key 'xxx'
	option preshared_key 'xxx'
	option endpoint_host 'x.x.x.x'
	option persistent_keepalive '25'
	list allowed_ips '10.10.100.0/24'
	list allowed_ips '10.10.0.0/23'
	list allowed_ips '10.10.10.0/24'
	list allowed_ips '224.0.0.4/30'
	list allowed_ips 'ff02::4/126'
	list allowed_ips 'fe80::4/126'
	list allowed_ips 'fd00::/120'
	option endpoint_port 'xxxx'


/etc/config/firewall    #配置防火墙

config defaults
	option input 'ACCEPT'
	option output 'ACCEPT'
	option forward 'REJECT'

config zone
	option name 'lan'
	option input 'ACCEPT'
	option output 'ACCEPT'
	option forward 'ACCEPT'
	list network 'lan'

config zone
	option name 'wg'
	option input 'ACCEPT'
	option output 'ACCEPT'
	option forward 'ACCEPT'
	list network 'wg0'
	list network 'wg1'

config forwarding
	option src 'lan'
	option dest 'wg'

config forwarding
	option src 'wg'
	option dest 'lan'


/etc/bird.conf    #bird OSPF配置

log syslog all;
router id 10.10.10.1;
protocol device {
	        scan time 10;
	                        }

protocol direct {
	        disabled;
	        ipv4;
	        ipv6;
	}

protocol kernel kernel4 {
	        ipv4 {
	              export all;
	        };
	}

protocol kernel kernel6 {
	        ipv6 {
	              export all;
	        };
	}

protocol ospf v2 ospf4 {
	        ipv4 {
	                import all;
	                export where source = RTS_STATIC;
	        };

	        area 0 {

	         interface "wg0" {
	              type ptp;
                       cost 20;
                       hello 5;
	                };

	        interface "wg1" {
	              type ptp;
                       cost 20;
                       hello 5;
	                };

	        interface "br-lan" {
	                };
	        };
	}

protocol ospf v3 {
	        ipv6 {
	                import all;
	                export where source = RTS_STATIC;
	        };
	        area 0 {
	                interface "wg0" {
	                        type ptp;
	                        cost 20;
	                        hello 5;
	                };

	                interface "wg1" {
	                        type ptp;
	                        cost 20;
	                        hello 5;
	                };
	        };
	}
VPS-B
/etc/wireguard/wg0.conf    #wg0配置文件

[Interface]
Address = 10.10.100.9/30,fd00::9/126,fe80::9/126  #接口ip
DNS = 8.8.8.8
PostUP = iptables -A FORWARD -i wg0 -j ACCEPT; iptables -A FORWARD -o wg0 -j ACCEPT;ip6tables -A FORWARD -i wg0 -j ACCEPT; ip6tables -A FORWARD -o wg0 -j ACCEPT    #更新添加防火墙策略
PostDOWN = iptables -D FORWARD -i wg0 -j ACCEPT; iptables -D FORWARD -o wg0 -j ACCEPT;ip6tables -D FORWARD -i wg0 -j ACCEPT; ip6tables -D FORWARD -o wg0 -j ACCEPT    #更新删除防火墙策略
PrivateKey = xxx    #本端私钥
MTU = 1420          #链路MTU
Table = off         #关闭自动添加路由表,OSPF维护路由表

#Name = VPS-A	    #描述对端名称
[Peer]              #一个对端模块
Publickey = xxx     #此对端的公钥
Presharedkey = xxx  #与此对端的预共享密钥
AllowedIPs = 10.10.100.0/24,10.10.0.0/23,10.10.10.0/24,224.0.0.4/30,fd00::/120,fe80::8/126,ff02::4/126    #此隧道允许的IP流量
Endpoint = x.x.x.x:xxxx    #对端的服务IP和端口
PersistentKeepAlive = 25   #保活时间


/etc/wireguard/wg1.conf    #wg1配置文件

[Interface]
Address = 10.10.100.6/30,fd00::6/126,fe80::6/126
DNS = 8.8.8.8
PostUP = iptables -A FORWARD -i wg1 -j ACCEPT; iptables -A FORWARD -o wg1 -j ACCEPT;ip6tables -A FORWARD -i wg1 -j ACCEPT; ip6tables -A FORWARD -o wg1 -j ACCEPT
PostDOWN = iptables -D FORWARD -i wg1 -j ACCEPT; iptables -D FORWARD -o wg1 -j ACCEPT;ip6tables -D FORWARD -i wg1 -j ACCEPT; ip6tables -D FORWARD -o wg1 -j ACCEPT
PrivateKey = xxx
ListenPort = xxxx    #服务监听端口
MTU = 1420
Table = off

#Name = Openwrt-B
[Peer]
Publickey = xxx
Presharedkey = xxx
AllowedIPs = 10.10.100.0/24,10.10.0.0/23,10.10.10.0/24,224.0.0.4/30,fd00::/120,fe80::4/126,ff02::4/126
PersistentKeepalive = 25


/etc/wireguard/wg2.conf    #wg2配置文件

[Interface]
Address = 10.10.100.225/27
DNS = 8.8.8.8
PostUP = iptables -A FORWARD -i wg2 -j ACCEPT; iptables -A FORWARD -o wg2 -j ACCEPT;ip6tables -A FORWARD -i wg2 -j ACCEPT; ip6tables -A FORWARD -o wg2 -j ACCEPT
PostDOWN = iptables -D FORWARD -i wg2 -j ACCEPT; iptables -D FORWARD -o wg2 -j ACCEPT;ip6tables -D FORWARD -i wg2 -j ACCEPT; ip6tables -D FORWARD -o wg2 -j ACCEPT
PrivateKey = xxx
MTU = 1420
ListenPort = xxxx
Table = off

[Peer]
#Name = Laptop
Publickey = xxx
Presharedkey = xxx
AllowedIPs = 10.10.100.226/27
PersistentKeepAlive = 25


/etc/bird.conf    #bird OSPF配置

log syslog all;
router id 10.10.100.9;
protocol device {
	         scan time 10;
	}

protocol direct {
	        disabled;
	        ipv4;
	        ipv6;
	}

protocol kernel {
	        ipv4 {
	              export all;
	        };
	}

protocol kernel {
	        ipv6 { export all; };
	}

protocol static {
	        ipv4;
	}

protocol static {
	        ipv6;
	}

# OSPF, both OSPFv2 and OSPFv3 are supported
protocol ospf v2 {
	        ipv4 {
	                import all;
	                export where source = RTS_STATIC;
	        };
	        area 0 {
	                interface "wg0" {
	                        type ptp;
	                        cost 10;
	                        hello 5;
	                };

	                interface "wg1" {
	                        type ptp;
	                        cost 100;
	                        hello 5;
	              };

	                interface "wg2" {

	                        type ptp; #终端接入的接口
	                };
	        };
	}

protocol ospf v3{
	        ipv6 {
	                import all;
	                export where source = RTS_STATIC;
	        };
	        area 0 {
	                interface "wg0" {
	                        type ptp;
	                        cost 10;
	                        hello 5;
	                };

	                interface "wg1" {

	                        type ptp;
	                        cost 100;
	                        hello 5;
	                };
	        };
	}
VPS-A
/etc/wireguard/wg0.conf    #wg0配置文件

[Interface]
Address = 10.10.100.10/30,fd00::a/126,fe80::a/126
DNS = 8.8.8.8
PostUP = iptables -A FORWARD -i wg0 -j ACCEPT; iptables -A FORWARD -o wg0 -j ACCEPT;ip6tables -A FORWARD -i wg0 -j ACCEPT; ip6tables -A FORWARD -o wg0 -j ACCEPT
PostDOWN = iptables -D FORWARD -i wg0 -j ACCEPT; iptables -D FORWARD -o wg0 -j ACCEPT;ip6tables -D FORWARD -i wg0 -j ACCEPT; ip6tables -D FORWARD -o wg0 -j ACCEPT
PrivateKey = xxx
ListenPort = xxxx
MTU = 1420
Table = off

[Peer]
#Name = VPS-B
Publickey = xxx
Presharedkey = xxx
AllowedIPs = 10.10.100.0/24,10.10.0.0/23,10.10.10.0/24,224.0.0.4/30,fd00::/120,fe80::8/126,ff02::4/126
PersistentKeepAlive = 25


/etc/wireguard/wg1.conf    #wg1配置文件

[Interface]
Address = 10.10.100.13/30,fd00::d/126,fe80::d/126
DNS = 8.8.8.8
PostUP = iptables -A FORWARD -i wg1 -j ACCEPT; iptables -A FORWARD -o wg1 -j ACCEPT;ip6tables -A FORWARD -i wg1 -j ACCEPT; ip6tables -A FORWARD -o wg1 -j ACCEPT
PostDOWN = iptables -D FORWARD -i wg1 -j ACCEPT; iptables -D FORWARD -o wg1 -j ACCEPT;ip6tables -D FORWARD -i wg1 -j ACCEPT; ip6tables -D FORWARD -o wg1 -j ACCEPT
PrivateKey = xxx
ListenPort = xxxx
MTU = 1420
Table = off

[Peer]
#Name = Openwrt-A
Publickey = xxx
Presharedkey = xxx
AllowedIPs = 10.10.100.0/24,10.10.0.0/23,10.10.10.0/24,224.0.0.4/30,fd00::/120,fe80::c/126,ff02::4/126
PersistentKeepalive = 25


/etc/bird.conf    #bird OSPF配置

log syslog all;
router id 10.10.100.13;
protocol device {
	          scan time 10;
	}

protocol direct {
	        disabled;
	        ipv4;
	        ipv6;
	}

protocol kernel {
	        ipv4 {
	              export all;
	        };
	}

protocol kernel {
	        ipv6 { export all; };
	}

protocol static {
	        ipv4;
	}

# OSPF, both OSPFv2 and OSPFv3 are supported
protocol ospf v2 {
	        ipv4 {
	                import all;
	                export where source = RTS_STATIC;
	        };
	        area 0 {
	                interface "wg0" {
	                        type ptp;
	                        cost 10;
	                        hello 5;
	                };

	                interface "wg1" {
	                        type ptp;
	                        cost 100;
	                        hello 5;
	                };


	        };
	}

protocol ospf v3 {
	        ipv6 {
	                import all;
	                export where source = RTS_STATIC;
	        };
	        area 0 {
	                interface "wg0" {
	                        type ptp;
	                        cost 10;
	                        hello 5;
	                };

	                interface "wg1" {
	                        type ptp;
	                        cost 100;
	                        hello 5;
	                };
	        };
	}
结果验证
VPS-A
VPS-B

Openwrt-A

Openwrt-B

发表回复